Wednesday 27 July 2016

Benefits of Camel Milk: Low Allergen Alternative to Dairy

The benefits of camel milk for allergies - autoimmune disease- autism and diabetes

The benefits of camel milk for allergies - autoimmune disease- autism and diabetes

Several weeks ago my husband, baby and I were at a conference, and during one of the breaks, I noticed they had camel milk as one of the refreshments on hand (along with water, coffee, kombucha, and paleo snacks).

I was slightly taken aback, as I can count on one hand the number of actual camels I’ve seen in my lifetime (only at the zoo), and the thought of drinking camel milk had never crossed my mind before seeing the bottles they had at the refreshment stand that day.

So of course, I had to research it to find out about any potential health benefits. And what I found out is VERY interesting!

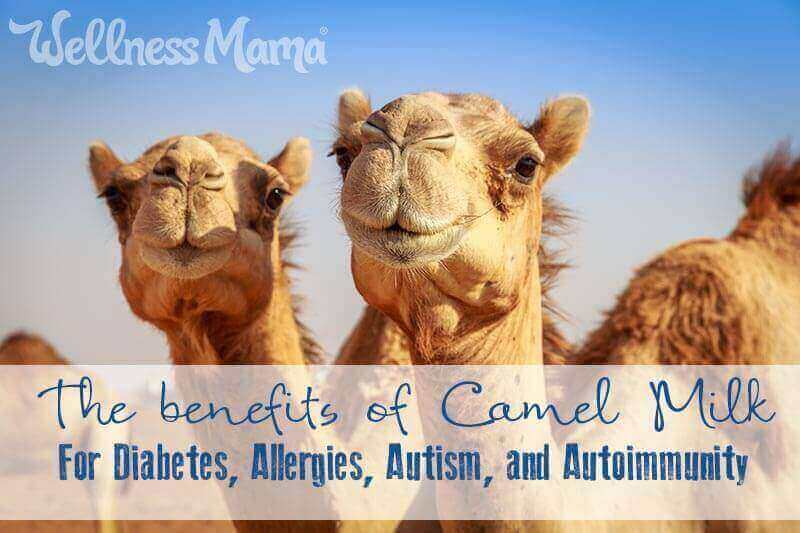
Camel milk is unique in its potential ability to help with allergies and autism, to mitigate autoimmune disease and diabetes and for heart and immune health. It has even been used around the world as a supplement to breastmilk!

Sound crazy?

I thought so too, but it turns out that the milk from a camel is an entirely different animal (pun intended) than milk from a cow or a goat.

Here’s why:

Cows, goats and other similar animals are hoofed animals. Camels have toes (only two, made of a single bone) and both their foot structure and the proteins in their milk are dramatically different than milk from hoofed animals.

To make things slightly more confusing, camels ruminate but are not considered ruminants. As unique as camels are, their milk is even more so.

What Makes Camel Milk Different?

I started researching this and was absolutely fascinated by the research on camel milk and how it is different from other types of milk.

Protein Structure

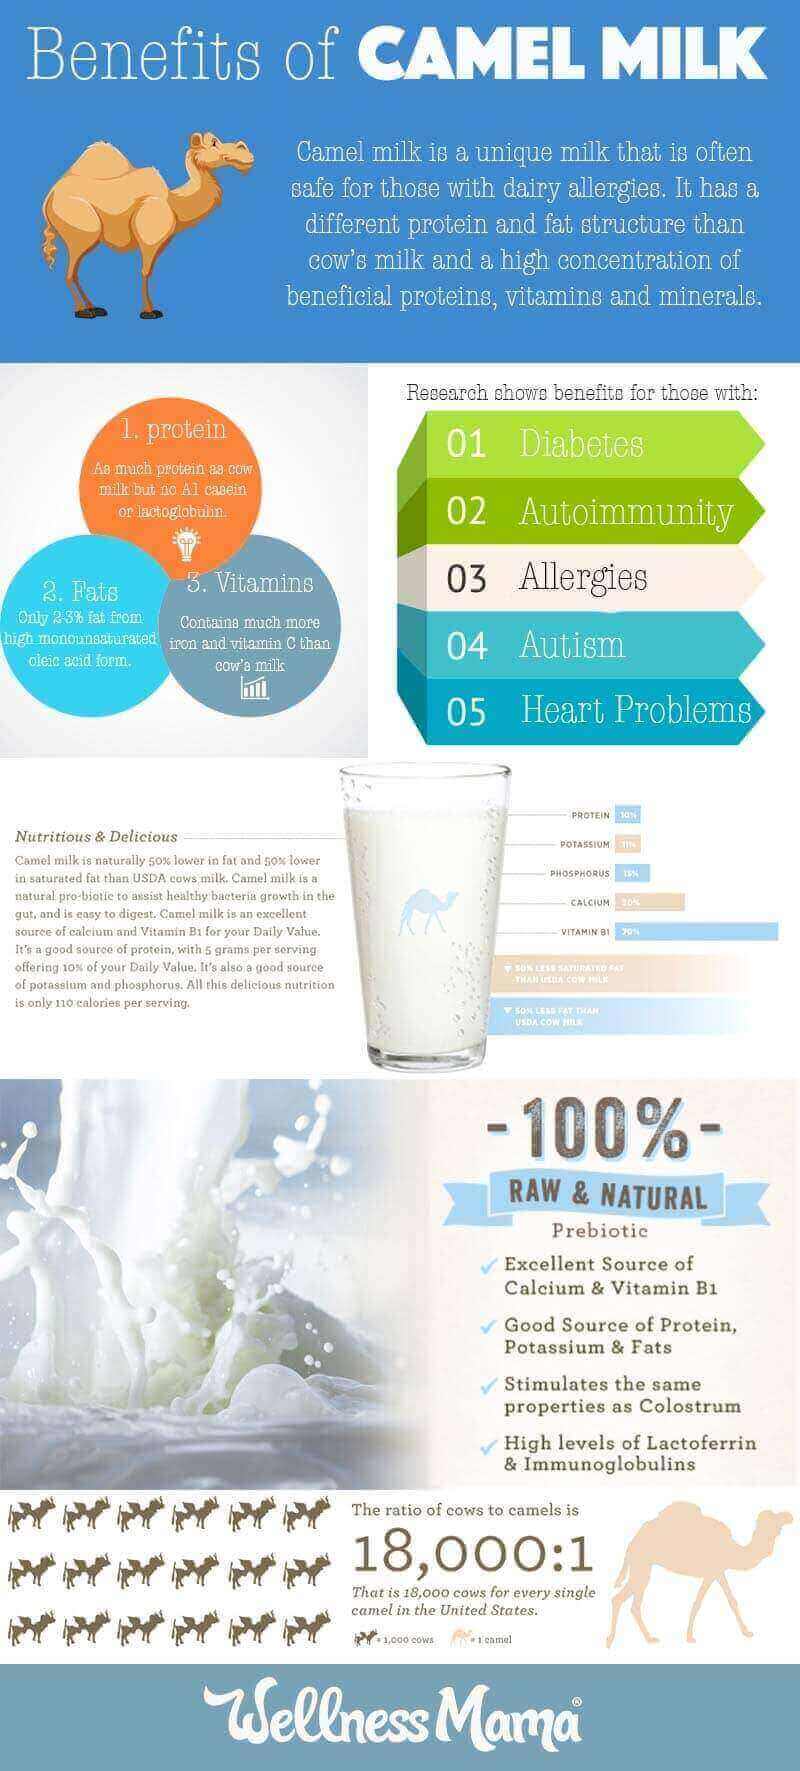
For one thing, camel milk does not contain the same proteins that people are often allergic to in cow’s milk. It does not contain A1 casein and lactoglobulin and is usually well tolerated by those with dairy allergies.

Gram for gram, it has about the same amount of protein and carbohydrates as regular cows milk, but impacts blood sugar differently.

Fat Content

This is one area where camel and cow milk differ greatly. Camels produce milk that is naturally low in fat (only 2-3%).

Also unlike cow milk, the fats produced by camels in their milk are completely homogenized naturally occurring Omega-3 fatty acids. This means that camel milk can be frozen and thawed without changing consistency. It also will not curdle or clot like cows milk.

Unique Properties

  • Camels produce a very unique milk that has some rare beneficial properties. For one thing, it is high in potent immunoglobulins, powerful immune-boosting substances. The immunoglobulins in camel milk are smaller than human immunoglobulins and can more easily pass into tissues in the body.
  • Researchers still don’t completely understand why, but these tiny immunoglobulins may be the reason for camel milk’s popularity in helping lessen problems like autoimmune disease, allergies and even autism.
  • This milk is also high in insulin, which improves its absorption and makes it suitable for diabetics.
  • Research has also found protective proteins in camel’s milk that may be antiviral, anti fungal and antibacterial.
  • Though it isn’t a spectacular source, it also contains much more iron and vitamin c than cow’s milk.

Similar to Human Breastmilk

Camel milk is nutritionally more similar to human breastmilk than to regular dairy milk. For this reason, it has been used around the world as a supplement or replacement for breast milk in cases when mom was unable to nurse or baby needed extra milk.

Better for the Environment

Consider the natural habitat of camels. They survive with relatively little water and plant life for long periods of time. For this reason, camels need much less grazing area and can produce milk with a lower environmental impact.

Long History of Use

While the idea of drinking milk from a camel may seem strange to those of us who grew up in the west, cultures around the world have consumed it for thousands of years.

Camels are important to various cultures, especially in the middle east, for their ability to survive and even travel long distances with very little water. Camels can thrive even in areas where horses and cows would have trouble surviving at all.

Benefits of Camel Milk

These unique properties of camels make their milk beneficial to humans in several ways. In researching, I was amazed at the initial studies and anecdotal reports from people who had seen near miraculous recoveries with camel milk.

Help for Diabetes

Studies show that camel’s milk may be very beneficial for those with diabetes. Unlike other milks, it shouldn’t cause a rise in blood sugar, but the benefits extend beyond that. In fact, some researchers are even using this milk to reduce the amount of insulin needed:

Camel milk has been shown, said the review’s senior author, Dr Uma S Dubey, of BITS Pilani’s Rajasthan campus, to be effective in reducing the level of glycosylated or glycated haemoglobin in the blood. This is haemoglobin to which glucose is attached, and is typically found at high levels in people with diabetes. Camel milk can therefore be used to reduce the dose of insulin that diabetes patients require.

The same review article, published in the Emirates Journal of Food and Agriculture, entitled Therapeutic Potential of Camel Milk, by researchers from India’s Birla Institute of Technology and Science Pilani, notes that there are also much lower rates of diabetes in areas where camel milk is a staple.

Another 2005 study out of India looked at camel dairy and its effects on Type 1 diabetes. This study found that regular consumption of camel milk reduced the amount of insulin needed and improved long-term blood sugar control.

Immune Boost

Camel’s milk contains many of the same immune-protecting substances as human milk. It can be an effective supplement to breastmilk for this reason.

It contains high levels of immunoglobulin A and beneficial enzymes like lysozyme and lactoperoxidase, which are helpful to the body in fighting infection.

Alleviate Allergies

Perhaps the most notable potential benefit of this unique milk is its effect in those with allergies.

Not only is it considered a good dairy alternative for allergic individuals, but there is some research indicating that it may actually help reverse allergies.

Surprised? I was too:

As I mentioned, this milk lacks A1 casein and lactoglobulin present in cow’s milk that often cause allergic reactions. There have also been studies showing that camel milk may even reduce allergies due to its immune benefits.

In fact, one 2005 study in the Journal of the Israel Medical Association investigated the effects of camel milk on children with severe allergies who didn’t respond to other treatments. Researchers had these children consume camel milk under the care of their medical team. They observed the results, which were even more astounding than expected.

Amazingly, all of the children recovered from their allergies according to the reports in the study. Additional study is needed, but the researchers in that study claimed that camel milk was more effective than medical treatments in those particular cases with no observed side effects.

This shows a tremendous potential as a hope for those struggling with life threatening allergies.

Heart and Blood Health

The monounsaturated fats (especially oleic acid) present in camel milk give it some of the same benefits as olive oil. It also contains A2 beta casein, which is different than the A1 casein found in most dairy milk. (A2 casein is present in goat milk as well, which is why some people who cannot handle cow dairy can handle goat based products.)

The A2 beta casein in camel milk may be partially responsible for the heart and immune protective effects. From Live Science:

A1 beta casein is broken down into an opioid-like peptide called beta-casomorphin-7 (BCM-7). BCM-7 has been shown to suppress the immune system, cause inflammation in the gastrointestinal tract and contribute to arterial plague formation, according to Lori Chong, a registered dietitian at The Ohio State University Wexner Medical Center. . “It has been implicated in the development of Type 1 diabetes — probably related to its immune suppression and role in GI tract inflammation.”

Other research indicates that the unique fatty acid profile in milk from camels is more beneficial to the heart and to maintaining healthy cholesterol levels.

Autism Connection

There is a great deal of anecdotal evidence and stories from people who have used camel dairy in cases of autism.

This article delves into the potential ways that camel dairy products may help against autism. In short, some researchers believe that autism is similar to autoimmune disease in that the body attacks its own healthy cells.

Whatever the cause, there are many anecdotal accounts of recovery and entire online groups dedicated to its use.

“Dr. Jodie Dashore, a mom and doctor, heard about the milk from Dr. Dietrich Klinghardt, a highly regarded neurobiologist who treated her son Brian’s autism. In 2011, when Brian started consuming camel milk, his motor tics initially became three or four times worse—a “healing crisis,” Dashore says, as the milk killed off harmful bacteria. But after two weeks, they started to drop off. The milk also seemed to clear up a host of Brian’s other maladies, from hives to mobility difficulties, caused by an autoimmune disorder (most autism patients have other simultaneous ailments according to the U.S. Centers for Disease Control and Prevention). It also eased Brian’s digestive pains and helped him gain weight, common issues in autistic children.

Other reports are equally amazing. A 2005 study in the International Journal of Human Development watched autistic patients who started consuming camel dairy instead of cow dairy and found:

  • A 4-year old girl noticed a complete disappearance of autism symptoms in 40 days
  • A 15-year old boy noticed recovery after only a month
  • Multiple other patients were noticeably better after only two weeks

Of course, much more research is needed to understand the way that camel dairy products may help with autism, but the initial evidence is definitely encouraging.

Autoimmune Disease Help

As mentioned, there are researchers that believe that autism is similar to autoimmune disease. This connection may also be why some people have seen improvement from autoimmunity with camel milk.

It is generally understood that autoimmune disease is a scenario in which the immune system mistakenly attacks part of the body, thinking that healthy cells are foreign or harmful antigens. Conventional treatments for autoimmune disease often include immune-suppressing drugs that have substantial side effects.

Camel dairy, on the other hand, contains those potent but tiny immunoglobulins that may penetrate cells and help improve the immune system while targeting only harmful antigens.

In fact, Dr. Reuven Yagil, an Israeli physiology professor who is considered an expert on Camel milk and its benefits, explains that in his years of research he has seen patients control or even reverse autoimmune disease with camel milk.

On a personal note, this was how I found research on the benefits of camel milk and I am personally testing it for my own Hashimotos (I’ll update with results).

Risks and Dangers of Camel Milk?

Often, something that seems too good to be true really is. In this case, I’m yet to find the downside. As I said, more research is needed, but I couldn’t find any downsides of drinking this unusual milk.

In fact, I didn’t find any cases of allergic reactions or harmful side effects. In my limited personal testing I haven’t noticed any negative effects, even though I often react to regular dairy.

The one downside, unfortunately, is the price. As you may imagine, camel dairies are not very popular in this part of the world, and limited access means higher cost.

Where to Get Camel Milk

You won’t find camel milk on the dairy aisle of a regular grocery store. Some health food stores are starting to carry it, but it can be difficult to find a good source.

Since this milk is not from a hoofed animal, it isn’t regulated by the same laws, and it is available online and can be shipped in many places.

The best (and least expensive) source I’ve found for camel milk is the Desert Farms brand that is available for shipping anywhere in the continental US. In fact, after researching camel milk and where to purchase it, I negotiated a 15% discount from them (code: MAMACAMEL) and am personally testing this for my own autoimmune disease. A friend is also testing for her child with severe allergies.

Camel Milk: Bottom Line

This “new” milk to us in the western world has been used for thousands of years in other parts of the world. Camels are unique animals and even more unique milk that may have benefits for diabetics, autistic patients, those with autoimmune disease and in immune health.

I was also unable to find any negative side effects of camel milk (other than the price) and am willing to become my own guinea pig to test its benefits (or lack thereof).

Your turn! Have you ever heard of camel milk? Grossed out or intrigued?

Benefits of Camel Milk

Continue Reading...Benefits of Camel Milk: Low Allergen Alternative to Dairy


source http://wellnessmama.com/124092/camel-milk/?utm_source=rss&utm_medium=rss&utm_campaign=camel-milk

Tuesday 26 July 2016

Radiant Life: Why I Love Them & My Favorites

Radiant Life my source for stainless steel items air filters and supplements

Did you know that:

Indoor air can be much more toxic than outdoor air?

In fact, the air in your home may be the most toxic air you encounter each day. 

This is for a variety of reasons, including:

  • Off-gassing from plastics used within the home
  • Residue of harmful chemicals from cleaning products
  • Build up of spray aerosols and personal care products
  • Flame retardants from furniture and clothing
  • Air fresheners and other chemicals sprayed into the air

At the same time that we are being chemically assaulted externally by the air in our homes, we are statistically not consuming enough of vital vitamins and minerals.

This two-fold problem is creating health problems for many families today and is one of the reasons I started writing this blog!

Thankfully, there are some easy ways to reduce all of these problems and a simple place that carries almost everything you need:

A Great Resource

One of my favorite places to buy things online is run by some of my favorite people: Radiant Life Catalog.

It isn’t just another online store and I’ve always been super impressed with everything I’ve ordered from there.

Here’s why:

The founders of Radiant Life, Norman and Kathy LeMoine and their children, are an awesome family.  Kathy faced some health issues of her own before overhauling her family’s diet and lifestyle. Now, they run Radiant Life as a resource of only the best quality research-backed products available.

In fact, their own focus as a company centers on these ideas:

1. Connecting with Nature
Radiant Life Wellness Mama

  • Contact with the earth’s energy through either walking barefoot or swimming in its oceans, lakes, rivers and streams. The benefits are now well documented
  • Living in harmony with nature – the cycles of the sun, moon and the seasons
  • Properly hydrating our bodies with pure water (we can live weeks without food but only a few days without water!)
  • Breathing clean air (The essential nature of the air we breathe requires no further explanation)

2. Fueling the body with good and delicious, nutrient dense, real foods… no exceptions

3. Incorporating key supplements and remedies supported by solid science showing life extension and health benefits

4. Avoiding whenever possible and eliminating toxins including pharmaceuticals, processed foods, dangerous electromagnetic frequencies and other stressors

5. Being active while incorporating proper fitness, speed and strength training

6. Ensuring proper sleep, rest and recovery

7. Maintaining a Positive Attitude and being a lifelong learner…be not what you were yesterday, live a purposeful life, strive for economic stability, give back, express one’s creativity, become spiritually enlightened, laugh and enjoy the good company of friends and family

Everyone Else Loves Them Too!

I order from Radiant Life often and use their products daily. In fact, every time I post a picture of anything from RL on Facebook or Instagram, I get asked “where did you get that!?” dozens of times.

When it comes to a lot of the items in my kitchen, our water filter and many of my supplements, the answer is the same:

I got it at Radiant Life.

In fact, these are all of the products in my home from Radiant Life:

Kitchen Items

Many of the storage containers, plates and kitchenware I have in my kitchen came from Radiant Life:

Supplements

Water

My husband and I researched for months and called with a hundred questions before finally getting the whole house water filter and under-sink 14-stage filter. Now that they are installed, these are virtually maintenance free for us.

Home+ Healthy Living

We also use several RL products in our home and for healthy living:

Have you ever ordered from Radiant Life? Which products would you love to try?

Radiant Life Products I love from Wellness Mama

Continue Reading...Radiant Life: Why I Love Them & My Favorites


source http://wellnessmama.com/124047/radiant-life/?utm_source=rss&utm_medium=rss&utm_campaign=radiant-life

Monday 25 July 2016

How to Make Your Own Reusable Snack Bags

How to make homemade reusable snack bags

How to make homemade reusable snack bags

We don’t use plastic in our home, but I do understand the convenience of plastic baggies for snacks on the go. When I am out and about with the kids I like to keep some healthy snacks in my purse for when hunger strikes.

There are a lot of great options for reducing plastic in your home and I love to use stainless steel lunch containers to pack healthy lunches for my kids when we go on field trips. But stainless steel and glass are not always practical for quick trips and tend to get quite heavy in my purse.

Cloth Snack Bags

The simple answer for snacks on the go is to use cloth snack bags. Etsy is overflowing with beautiful options for reusable snack bags, most of them handmade by stay-at-home-moms.

If you have even a basic knowledge of sewing, you also have the option to make some yourself.

A few weeks ago I made a few baby bibs for a friend’s baby and I decided to make some coordinating reusable snack bags to go with the bibs.

Fabric

Since I was coordinating the bags to the bibs I previously made, I used this organic cotton print (dyed with low-impact dyes) for the outer fabric and an organic cotton muslin for the inside lining. (I used this fabric for the bibs.)

Cotton is easy to work with, it is easily washable, and there are a lot of cute prints to choose from. The only drawback is that cotton snack bags are better suited to dry snacks such as trail mix, homemade jerky, wellness energy bars, and grain-free crackers, just to name a few.

A thicker fabric such as canvas or home decorator fabric would offer a thicker bag that would be good for foods like sliced carrots, grapes, or snap peas, but it still won’t be waterproof.

Supplies:

  • sewing machine
  • fabric
  • 3/4″ wide hook and loop
  • thread
  • sewing pins
  • ruler or measuring tape
  • iron

Directions:

Use 1/4″ seam allowances. Finished bag will be 6″ w by 5.5″ h.

  1. Cut one rectangle 13.5″ by 6.5″ from both the outer fabric and the lining fabric. If you have a one way print you will want the long measurement to parallel the direction of the print.
  2. Pin the two pieces together with right sides together.
  3. Leave a 3″ opening on one of the short ends so that you can turn the pieces right side out.
  4. Start on one of the short ends about 1.5″ from the corner. Sew toward that corner and continue all the way around the rectangle, stopping 1.5″ after the last corner. This will leave the 3″ opening.
  5. Clip the 4 corners.
  6. Turn the bag right side out by pulling it through the opening.

    Stitching homemade snack bags

  7. Press seems flat around the edge, making sure to press the open section as well. That section will be closed when you top stitch.
  8. Measure across the narrower width of the bag and cut both sides of the hook and loop to this measurement. Mine was about 5.75″ long.
  9. Lay the bag down on the table, outside fabric down. Take the short end that does not have the opening and fold it up about 5.5″
  10. Lay one side of the hook and loop (it doesn’t matter which side) 3/8″ down from the top of the bag (on the lining side). Lay the other side 5/8″ down from the edge you folded up (on the printed side). Pin both pieces in place.

    Pinning homemade snack bags

  11. Unfold the bag and sew the hook and loop to the bag by stitching along the long edges of each strip.
  12. Refold the bag like you did in step 9. Pin it in place.
  13. Beginning at one bottom corner, stitch up the side of the bag a scant 1/8″ from the edge.
  14. Sew all the way to the top corner, pivot at the corner, and continue across the top. This will give a nice top stitch and also close the opening.
  15. Pivot at the other corner and sew down the third side. It is not necessary to sew along the bottom edge but you could if you want the look of the top stitching.

Finishing homemade snack bags
If you enjoy making these bags, check out my tutorial for making your own produce bags!

Do you use reusable snack bags? Will you try to make your own?


Continue Reading...How to Make Your Own Reusable Snack Bags


source http://wellnessmama.com/124021/make-snack-bags/?utm_source=rss&utm_medium=rss&utm_campaign=make-snack-bags

Saturday 23 July 2016

How to Make a Soy Sauce Alternative

Mountain Rose Herbs: My Favorite Place for DIY & Remedies

Mountain Rose Herbs Review and how to save 25 percet

Save hundreds a year by making your own beauty products, cleaning products and spice blends…

That is what I set out to do years ago when I was on a super-tight budget and just starting to raise my family. I realized that the easiest way to save money on all of these products and avoid the harmful chemicals I didn’t want around my kids was to make them myself.

I figured out how to save money while using the highest quality products available and I’m sharing my tips with you:

Enter Mountain Rose Herbs

I researched meticulously to find a place that carried the ingredients I needed and that met my criteria:

  • Organic
  • Wild-crafted or ethically sourced
  • Don’t cost a fortune
Mountain Rose Herbs meets all of my criteria and even though their products can seem a little expensive up-front, I save more in the long run with bulk discounts!

In fact, I save up and only order one or two times a year for the best prices on products and shipping (and to lock in the bulk discount).

Now, I get dozens of questions a day about where I get products and ingredients like:
Mountain Rose Herbs. A herbs, health and harmony c

The answer is almost always that I order from Mountain Rose Herbs!

After getting a few thousand of these type of questions, I thought a post with my time and money saving MRH shopping tips would be helpful!

How to Get Bulk Discounts

It is important to know that MRH does not work like shopping on Amazon (shameless plug) and to plan accordingly! Their shipping is definitely not free or two-day and they aren’t good for ordering a last minute need or a single ingredient.

That said, they can often be better than huge stores and discount shops on both the quality of ingredients and prices if you plan ahead of time.

Here’s what I do:

I keep a running list in my phone of herbs, spices, containers, butters, etc. that we need and plan to order no more than every three months. If I’m close to a bulk discount order amount, I’ll see if friends and family need anything so we can get the maximum discounts.

How to get Mountain Rose Herbs Bulk Discounts

Note: These discounts only apply to whole-pound quantities of spices, herbs, teas and seasonings. Ordering smaller 4 or 8 ounce bags instead of a pound won’t apply toward the discount. In other words, two 8-ounce bags don’t count as a pound toward the discount.

Mountain Rose Herbs Review

As an example, an order to stock up our pantry (and share with others) would be (all from this page)…

One pound of each of these:
Mountain Rose Herbs

  • basil
  • oregano
  • paprika
  • chili powder
  • turmeric
  • black pepper
  • chamomile flowers
  • rooibos tea
  • nettle leaf
  • alfalfa
  • peppermint

Two pounds of each of these:

  • cumin
  • onion powder
  • garlic powder
  • chia seeds

And larger quantities of a couple of most-used items:

  • 3 pounds of elderberries (for elderberry syrup in winter)
  • 5 pounds of chia seeds that I use in many recipes

By buying in bulk, I save 25% on all of those.

Other Things I Order

I also often buy ingredients for my homemade beauty products from Mountain Rose Herbs. They don’t offer bulk discounts on these, but I find their prices very reasonable and their products are the best quality I’ve found. Also, while they don’t offer discounts, ingredients are cheaper in larger quantities so it can still be beneficial to buy in bulk and share.

Bulk ingredients from MRH

The beauty ingredients I always order in bulk from them and keep on hand are:

I almost always order these ingredients from MRH for a few reasons:

First, I find that ordering bulk quantities of these once or twice a year is enough to make beauty products for our whole family and save money in the long run. Also, after trying many different brands and types, I am convinced that Mountain Rose Herbs has the highest quality ingredients available (that are also fair-trade and organic).

TIP: Check for Monthly Specials

While MRH doesn’t offer a lot of discounts, they do have some great monthly specials. You can check out the updated list each month at this page. I find that many times, the items on sale are probably not ones I would use, but sometimes there is an awesome deal. (Most noteworthy was the time I found Red Raspberry Leaf on sale for $5 a pound!)

Due to the great bulk discounts, I also find that MRH is often the most budget-friendly place to order DIY ingredients in the long run.

Ever tried Mountain Rose Herbs? 

Continue Reading...Mountain Rose Herbs: My Favorite Place for DIY & Remedies


source http://wellnessmama.com/123938/mountain-rose-herbs/?utm_source=rss&utm_medium=rss&utm_campaign=mountain-rose-herbs

Friday 22 July 2016

9 Ways to Use a Himalayan Salt Block in Your Kitchen

How to use a salt block for cooking and curing and serving

How to use a salt block for cooking and curing and serving

I’ve been a pan of Himalayan Salt and salt lamps for a long time, and in the past few months I’ve also come to love cooking with a himalayan salt block or cooking tile.

Here’s why its awesome:

Salt has been used  and valued throughout history and was so valuable in the 1800s that it was worth 4 times as much as beef on the frontier. Thankfully, salt isn’t as (comparatively) expensive now, since every cell in the body contains salt and it is essential for life.

Plus it tastes good. We all add salt to foods (and even sometimes drinks). Now, there’s an even better way to get the benefits and flavor of salt. Salt Blocks.

What is a Himalayan Salt Block?

As the name suggests, a Himalayan Salt Block is a large block of pink salt. Why would one want a large block of salt, you ask?

Here’s why:

Salt Blocks are one of the best cooking and serving surfaces I’ve found. They provide a complex and amazing salt flavor without being overbearing.

They are easy to use and maintain and they make you look really sophisticated when you serve food on them.

Where to Get One:

Himalayan salt blocks are widely available now. These are the one’s I’ve personally tried:

This is also a great cookbook on salt block cooking if you get really adventurous. Now that you’ve got a huge chunk of ancient salt in your kitchen, here’s how to use it:

Tempering a Salt Block Before Using

Salt blocks can be heated or cooled to extremely hot and cold temperatures and are versatile for this reason. Since they are a natural product with imperfections and lines, it is important to do this slowly. Heating a salt block too quickly can cause it to crack or otherwise break, but if cared for correctly it will last a really long time.

It is especially important to heat a salt block carefully, especially the first few times it is used. This ensures the strength of the salt block over the long term and improves it as a cooking surface. This process is called tempering and is simple to do:

How to Temper a Salt Block:

  • Place block in the oven on a low rack
  • Turn oven on to lowest setting (usually 170 degrees)
  • Leave it for 30 minutes at this temperature
  • Increase temperature by 50 degrees and leave another 30 minutes
  • Repeat this process, raising 50 degrees every 30 minutes, until it reaches a temp over 500 degrees
  • Turn the oven off and leave the salt block there, with the door closed, until it completely cools to room temperature
  • My salt block made some crazy cracking sounds and developed visible lines when I tempered it. Apparently, this is normal.

Congrats! Now your salt block is ready to use!

How to Heat a Himalayan Salt Block

When ready to use, it is important to heat the salt block correctly. Heating it is slightly more complicated than just turning on a burner and cooking in a pan. It isn’t difficult though and with a little prep, a salt block becomes a simple way to cook.

How to Heat a Salt Block on the Stove

  1. Make sure it is completely clean and dry and that it has been at least 24 hours since it was wet.
  2. Place the salt block over a gas burner (or over an electric range, but place a metal ring or grate of some kind in between to allow air to flow between).
  3. Turn the heat on low and set a timer for 15-20 minutes (depending on size- larger blocks take longer).
  4. Increase the heat to medium and leave for another 15-20 minutes.
  5. Turn up again to medium/high for another 10-15 minutes.
  6. If you have one, use a laser thermometer to make sure the block is around 500 degrees. Don’t have one? Splatter a few drops of water on the salt and make sure they dance and evaporate immediately. Be careful not to touch it (seems obvious, but very important as it will maintain heat for a long time).
  7. At this point it is ready to use. See instructions below for cooking instructions for various foods.

How to Heat a Salt Block on the Grill

  1. Salt blocks can be used on gas and charcoal grills.
  2. On gas grills, start with low heat just as you would on a gas stove and work up slowly.
  3. With a charcoal grill, put all the charcoal on one side and the salt block on the other.
  4. Watch the temperature carefully to ensure it doesn’t heat up too fast.

The thickness and strength of a salt block make it an amazing surface to cook on and once heated, it will hold temperature for quite a while without a heat source. When you use it on a grill, it adds a delicious smoky and mildly salty flavor to vegetables and meats.

How to Cook on a Himalayan Salt Block

Once the block is preheated, you’re ready to cook! The long pre-heating time is a great time to prepare any meat, vegetables, seafood, or other foods you are cooking on your salt block.

The most important things to know when cooking on a salt block are:

  • The block must be fully heated before using– A block that is not hot enough will actually over-salt and under cook food (not a good combination).
  • Fast-cooking foods are best– You wouldn’t want to make a roast or any foods that take a long time to cook on a salt block. Typically, the faster the food cooks, the better it works on a salt block. Steak and thin cuts of meat work well. Seafood is another good option and quicker cooking vegetables like asparagus and zucchini are also great.
  • Don’t use oil on the block– The oil will work itself into cracks in the salt and eventually go rancid if it doesn’t catch fire first while you are grilling/cooking.
  • Keep on cooking– Once you preheat the block, you can cook on it for several hours. Plan to cook your whole meal and dessert on the salt block to maximize its use. Create a hibachi night on the salt block or grill steaks and veggies.
  • See the recipes in the bottom of this post for specific suggestions.

How to Care for Your Salt Block

The first rule of salt blocks is that you don’t talk about salt blocks:

Just kidding:

The first rule of caring for a himalayan salt block is let all temperature changes happen slowly. And DO NOT put it in a dishwasher. Ever.

This rule applies to all salt products you may use in your kitchen including salt glasses, etc. Guess what happens when you put a big piece of salt in constantly moving water (dishwasher) for an hour?

That’s right… no more block and a really salty dishwasher. Just don’t do it.

Now that we got that out of the way, remember these simple steps in caring for a salt block:

  1. Let it cool naturally and completely after cooking. It must be completely cool before cleaning.
  2. Salt is naturally antibacterial and easy to clean. Do not use soap and use as little water as possible. The more water you use the faster the salt block will wear away since each washing takes away a tiny layer of salt.
  3. Scrub down with a scouring pad or sponge to remove any food residue.
  4. Do a final wipe with a clean, slightly wet sponge.
  5.  Towel dry with a clean towel and allow to air-dry for 24 hours before use.

9 Ways to Use a Himalayan Salt Block

Now that you know how to care for a himalayan salt block, there are so many ways to use it in your home! These are my favorites:

Make Delicious Grilled Vegetables

My personal favorite way to use a salt block! The salt perfectly seasons the vegetables and the high heat creates delicious flavor.

What to do: Heat the block over the stove or grill as desired. Brush 1 pound of fresh asparagus (or other vegetable) with a tiny amount of olive or avocado oil and sprinkle with a little garlic powder and white pepper (or other spices). Remember to brush the oil on the vegetables and not the block itself.

Grill a Perfect Steak Indoors

Don’t feel like lighting the outdoor grill? Salt blocks are a great way to grill indoors and get a perfect steak!

What to do: Preheat the salt block as explained above. Sprinkle the steak with pepper and garlic and onion powders. Place the steak on the block carefully. Leave for 3-5 minutes per side depending on thickness and desired doneness. Flip once and cook until done.

Add Flavor to Baking

I wouldn’t have personally thought of using a salt block for baking but a friend mentioned that she loves using it this way. It imparts a delicious mild salt flavor to baked goods and even cookies!

What to do: Preheat the salt block as normal. Transfer carefully to a 350 degree oven. Bake cookies, scones or other baked good recipes directly on the block.

To Add Minerals To Food

Himalayan salt contains many minerals besides just sodium and when you cook with a block of it, these minerals end up in your food.

Keeping Foods Cold

A thick himalayan salt block will stay warm for hours for cooking and it will also stay cold for hours. This makes it perfect for serving cold foods. This is why I keep small soap-size salt blocks as ice packs in the freezer. Serve cold foods like fruit, salmon, or cheeses on a chilled salt block to keep them cold for hours.

Cure Foods

Salt is used to extend the shelf life of food and salt blocks are a great way to cure some foods. The Meadow explains how salt blocks are a perfect way to cure salmon to make Gravlax and how to do it.

Amazing Seafood

Salt blocks make great steaks. They also make amazing seafood. My favorite way to use salt blocks for seafood is to marinade fish, scallops or shrimp in a lemon juice, fresh ginger and coconut aminos overnight and grill on a himalayan salt block. Perfection.

Fancy Way to Serve Food

Even at room temperature, the salt block makes a fancy serving platter and conversation piece. It also adds a delicious flavor even at room temperature. Serve foods like chocolate and strawberries on it for a fancy look or cover with cured meats and cheeses for a party.

Make Poke

Poke (poh-keh) is all the rage right now and with good reason. It is delicious! If you’ve never made it at home, it is worth it (here’s a great recipe). I add a step of curing the raw tuna on a salt block in the refrigerator for a few hours before using it in the poke. This gives it a partial cure and adds depth of flavor.

Himalayan Salt Block: Bottom Line

A salt block certainly isn’t one of the kitchen item I can’t live without but it is a versatile and fun way to cook and add flavor to food. It won’t replace my Instant pot any time soon, but I do enjoy cooking and especially grilling with salt.

Ever used a salt block? Let me know how it worked for you!

Continue Reading...9 Ways to Use a Himalayan Salt Block in Your Kitchen


source http://wellnessmama.com/123922/himalayan-salt-block/?utm_source=rss&utm_medium=rss&utm_campaign=himalayan-salt-block

Thursday 21 July 2016

What is Limu Juice?

Seaweed FarmerEverywhere  you look, some new “health company” is spending big on advertising in an attempt to cash in on the world’s most profitable industry.

It might be an exercise program, dieting plan, or a miracle supplement.  It’s almost as if the industry wants us to believe the nutritional community is making a groundbreaking discovery every month or two. All too often, these are the same diet trends and programs that are being rebranded in more up-to-date packages.

Worse yet, some of these trendy new diets have no basis in science and can be potentially harmful.  Afterall, most of these products are sold as “revolutionary”.

So if you’re wondering if Limu juice is another one of these, I don’t blame you.

However, I’m here to tell you that Limu juice and limu moui are NOT some new dieting trend.

Introducing Limu Moui

In fact, Limu has been a staple in the diets of Polynesian natives throughout the islands for hundreds of years.

To these peoples, the word limu has several related meanings, spanning from moss and lichen to seaweed and algae.  Various polynesian groups have incorporated limu into their diets generation after generation, providing them with a rich profile of nutrients.

Specifically, Tongan Limu Moui is a type of brown seaweed that is found around the shores of the Tonga Islands.  It is extremely nutritious and is used as a dietary supplement with various benefits.

What is Limu Juice?

To put things simply:

Limu Moui is a superfood with a ton of nutritional benefits.  Limu Juice is a fruit drink containing limu moui extract.

Today, you can find limu supplements, limu facial creams, and other limu-based products.  Not surprisingly, the undisputed leader in the limu product industry is called The Limu Company.  Their Limu Original Juice is easily the most recognizable limu superfood product in the world today.

As more and more people rave about Limu Original Juice, Limu Energy (BluFrog), Limu Lean, the interest in this company grows.  Many testimonials talk about how the products have changed their lives.  (This buzz is what likely led you to reading this post today.)

Still, there are concrete questions that still need to be answered.

What is Limu Juice Made Of?

Limu Juice is not simply pressed seaweed; it’s much more than that.

It contains a compound of particular interest called fucoidan.

The fucoidan is concentrated using The Limu Company’s proprietary extraction process.  It has been shown to provide some amazing benefits when consumed on a regular basis.  It is what separates limu from regular seaweed and comparable plants and algae.

The Limu Company blends this fucoidan extract with real mango, apple, pear, and papaya to provide an extra pop of antioxidants as well as a great taste.

What Does Limu Juice Do?  

Fucoidan is a compound that is found exclusively in brown seaweed and brown algae, in species such as kombu, wakame, mozuku, hijiki, and bladderwrack, to name a few. It is classified as a sulfated polysaccharide which provides a number of benefits for the body.

Limu and other marine vegetables containing sulfated polysaccharides have been used in herbal Chinese medicine for thousands of years.  But over the last ten, increased scholarly interest has resulted in several different studies revealing promising benefits.

Effects of Sulfated Polysaccharides

Sulfated Polysaccharides have been shown to possess beneficial properties including:

  • Anticoagulant (reduces blood clotting)
  • Antiviral (kills viruses)
  • Antioxidant (inhibits oxidation and removes free radicals in the body)
  • Antiprotozoal (kills protozoa in the body or inhibits their growth)
  • Antiinflammatory (reduces inflammation, one of the true causes of all disease)
  • Antibacterial (kills bacteria)
  • Antitumor (preventing the formation and growth of tumors)
  • Antilipemic (prevents the accumulation of fatty substances in the blood)
  • Immunomodulatory

The Benefits of Limu and Limu Juice

Although the research has been very promising, it’s unlikely the FDA would ever allow limu supplement companies to make medical claims.

The FDA draws a real line between nutritional products and medical products, so the The Limu Company’s hands are somewhat tied when it comes to what benefits they can claim.  Although the major benefits of fucoidan are well-known in the medical community, there is only so much nutrition-focused companies can say about their products.

Some of the claims that can be made about Limu Juice are:

  • Supports your immune system
  • Improved joint mobility
  • Increased energy
  • More restful sleep
  • Softer, smoother skin
  • Greater sense of health & wellness
  • Promotes healthy blood cholesterol
  • Allergy relief

You’ll notice a major difference between what the studies say and what limu supplement companies are allowed to say about their products.  As great as “increased sleep” is, “antitumor” is a lot more compelling.

Good thing we know the FDA always has our back! (Not!)

My Experience with Limu Juice

I have joined the thousands of people that are experiencing the benefits that Limu Juice is able to provide. After drinking Limu Juice regularly for the past few months, I can tell you first hand that the claims that you read online about this drink are real.

I have never felt better before in my life. After the first month of trying it, I lost 4 pounds, my pants are too big for me, and I have more energy now than ever before. If you are looking for a diet that actually works, I could not recommend Limu Juice highly enough.

The post What is Limu Juice? appeared first on Limu Juice.


source http://www.limujuice.net/limu/what-is-limu-juice/

source http://limujuice.blogspot.com/2016/07/what-is-limu-juice.html

Wednesday 20 July 2016

How to Grow a Beautiful Lawn Naturally

How to grow a good lawn naturally and organically

How to grow a beautiful lawn naturally and organically

Once upon a time, a well-meaning landscaper offered to do some work for our yard. He suggested spraying the yard with Glyphosate to “get rid of all the unsightly dandelions and weeds (like *ahem* plantain) to grow a beautiful lawn.

The poor guy didn’t quite understand why I was so adamant that there would never be glyphosate sprayed in our yard under any circumstances. He insisted that “it really is non-toxic and completely safe as soon as it dries.”

I also had to explain to him that we actually like those so-called “weeds” in our yard and that we use dandelion in various ways. Our definition of a “good lawn” was different than his!

Is it Possible to Grow a Beautiful Lawn Naturally?

In many places, an attractive and “good” lawn means one free of weeds with a lush carpet of uniform green grass. In fact, Americans are so obsessed with attractive lawns it is now a multi-billion dollar industry.

We spend money to kill the plants that are already growing and then plant or sod with grass. We replace the natural ground coverings like clover, plantain and dandelion (which are great for pollinators) with flowerless grass for the sake of looks.

I definitely understand why, and in many neighborhoods with HOAs, these are requirements. The good news is that there are many ways to maintain an attractive lawn without the need for harsh chemicals.

Making this switch can actually help save money! It will also improve growth for pollinators and reduce chemical use and exposure. It will also create a safer lawn for children and pets to play on!

The Problem with Lawn Chemicals

Many people assume that lawn chemicals are completely harmless, but that isn’t the case. In fact:

Our love affair with lawns comes with a cost. Each year U.S. homeowners apply more than 3 million tons of synthetic lawn fertilizers and 70 million pounds of lawn pesticides and herbicides. These chemicals pose serious hazards to our children, our pets and wildlife of all kinds. To make matters worse, it’s estimated that 65 percent of these chemicals find their way into our lakes, rivers and underground aquifers. (1)

The US Wildlife Federation also reports these environmental effects of our lawn care practices:

  • The average lawn gets up to 10x as chemical pesticide and herbicide use as commercial farmland! This means that the grass your children are running on barefoot probably contains more chemicals than commercially sprayed wheat, corn and soybean crops! Obviously, this isn’t great for pets either!
  • When these chemicals are used as much as 90% of the earthworm population in a lawn is killed. This is very detrimental for the soil over time.
  • Lawn equipment like mowers and weedeaters (or weedwackers, depending on where you’re from), emit much more waste into the air than cars and trucks.
  • 25-60% of residential water usage (depending on location) goes to watering lawns. With droughts in many areas, this is a substantial water burden.

Natural and Organic Lawn Care Basics

Making the switch to natural lawn care may be one of the easies and cheapest switches you can make. It is certainly an easier process than things like improving the water in your home or even overhauling your meals with meal planning (though I recommend those too!).

Use these basic steps  to create a more natural lawn:

Improve the Soil

Many beautiful lawns are really just nice looking on the surface. Most are used to being fed and watered from above by irrigation and fertilizer. They don’t have a deep root system and can be affected easily by drought or other problems.

When it comes to growing anything, including a lawn, it is good to start from the bottom up. Improving soil first will give your grass a foundation for long term growth. It will also make the grass more hardy and reduce the need for watering and chemicals.

Soil testing helps you know what is needed for your lawn. Free or inexpensive soil testing is available in many county extension offices or local garden shops. Find one in your area to get a soil test.

If you don’t want to soil test, just use a shovel to remove a 6-inch deep section of soil and grass. Healthy soil should be dark and crumble easily and grass should have a strong root system.

If the sod sample is dry or compacted, the roots may appear weak and shallow. A dense accumulation of dead roots, stems and partially decayed organic matter at the base of the grass is called thatch. Normally this material gets re-incorporated into the soil by microorganisms and earthworms. In poor and/or biologically inactive soils, this organic matter accumulates at the soil surface and creates an ideal environment for disease. Thatch can be removed by vigorous raking or by using a power dethatching tool. Thatch is rarely a problem if you have fertile, biologically-active soil, and your lawn is maintained according to the practices recommended for natural lawn care. (2)

Good soil for grass also has a pH that is slightly acidic and just under 7.

Steps for Better Lawn Soil

  • First, aerate in the spring if needed to improve soil texture.
  • Then, fertilize once per year with compost. This is called topdressing and is done by adding up to an inch of compost or topsoil and raking into the grass.
  • Finally, add pH adjusters if needed to get the pH in optimal range.

Choose Good Grass

Ask a local 4-H office or lawn care expert what grasses are native to the area. Choose one that is hardy and doesn’t need a lot of extra water.

Also consider sun and shade requirements, how much traffic your lawn gets and how much rain your area gets when choosing a grass. The University of Georgia, College of Agricultural and Environmental Sciences suggests these as the max times to wait between waterings for different types of grass:

12 – 21 days: Bahia grass, Buffalo gass, Bermuda grass, St. Augustine grass, Centipede grass
8 – 12 days: Carpet grass, Fine fescue, Kikuyu grass, Seashore paspalum, Tall fescue, Zoysia
5 – 7 days: Ryegrass, Kentucky Bluegrass, Bentgrass

These times are a good measure of a grass that grows well in your area and a helpful metric in selecting a grass.

You may not love to hear this, but growing a single plant (like one type of grass) over a large area is unnatural. This increases the chance of disease and nutrient demand.

Add a crop like white clover to grass to improve the nitrogen content of the soil and keep a thick, lush lawn. If you have the ability, converting part of your lawn to a wildflower growth area for local flowers is a great way to improve soil and make pollinators happy.

Steps for Choosing Good Grass for a Lawn

  • First, make sure soil is ready
  • Find out which varieties of grass grow best in your area
  • Choose a grass that matches your yard conditions (shade/sun, etc.) and that won’t require much watering
  • Finally, overseed in the Fall. Overseeding is spreading 3-4 pounds of grass seed per 1000 feet of lawn. Cut grass to about 2-2.5 inches before seeding for optimal growth

Mow the Right Way

Most of us over-mow our yards:

We think that shorter is better, but it isn’t!

It is much better to mow often but not as short. Cutting grass below 2 inches can stress the plant and expose the roots. This also causes over-drying and can deplete soil resources more quickly.

Steps to Mow the Right Way:

  • Don’t mow shorter than 3 inches
  • Mow more often and don’t cut more than 1/3 of the leaf off at a time
  • Don’t mow when it is too hot or too dry
  • Keep mower blade sharp and set at the highest setting
  • If you have a small lawn, consider using a Reel mower (we like this one) and get some exercise in the process!

Water Carefully

Lawn watering accounts for over half of residential water usage in the summer. Using the steps above will reduce the amount of water needed and create a stronger lawn.

It is also important to water consistently:

Water early in the morning to prevent fungal disease and reduce evaporation loss, Osborne advises. Deep, infrequent irrigation forces grass to send roots down into the soil to find moisture and makes it more drought-tolerant. The amount of water to use varies for each grass variety and soil type, but about an inch every week—from rainfall or your hose—is enough to keep an established lawn green. (3)

In other words:

It is best to water more deeply and less frequently for a healthy, beautiful lawn.

Steps to Water Grass for a Good Lawn:

  • Water less frequently but more deeply
  • Choose grass that is more drought tolerant
  • Most lawns need about 1 inch per week
  • If it rains this much, there is no need to water

Fertilize Naturally

There is really no need for expensive chemical fertilizers. Natural fertilizers like compost work just as well!

Natural solutions also nourish the soil over time, not just feed the grass from the top. This creates a stronger lawn over time.

Top dressing is one way to do this. Scatter 1/2 inch compost or natural fertilizer over the grass and rake in. Alternately, broadcast natural fertilizer after aerating or before watering.

Add the necessary nutrients determined by soil testing. Your lawn will improve dramatically if your grass is in need of certain nutrients or a different pH.

Steps to Fertilize Naturally:

  • Broadcast a natural fertilizer in the fall or spring
  • Topdress with 1/2 inch of compost or natural fertilizer and rake into the grass
  • Use a seaweed extract as additional fertilizer
  • Focus on soil quality over time instead of a quick fix

Stop Weeds Without Harmful Chemicals

This is the hardest part to do naturally, but you can do it!

Did you know that weeds can be an indication that lawn health isn’t optimal? Improve the soil and you will already be a long way toward reducing weed growth. Many herbicides are harmful to humans and animals too!

Herbicides used to control or kill lawn weeds typically contain 2,4-D, which has demonstrated toxic effects on the thyroid and gonads and has been linked with the occurrence of non-Hodgkin’s Lymphoma. Glyphosate, the active ingredient in RoundUp, is an endocrine disruptor and has been linked to “symmetrical parkinsonian syndrome” and Attention-Deficit/ Hyperactivity Disorder. (4)

Leaving grass longer also helps control weed population by leaving a larger surface area for grass to photosynthesize.

Steps to Reduce Weeds Naturally:

  • Many weeds are actually herbs with many benefits. Don’t remove them at all!
  • Leave grass longer so it will resist weeds naturally
  • Add a second plant to your lawn like white clover to compete with weeds and replenish soil
  • Avoid harmful herbicides and use natural methods instead

Grow a Garden Instead!

Feel really brave?

Ditch the lawn completely and grow a garden instead!

You can grow vegetables, herbs and fruits in your front yard and make it look beautiful too! Incorporate vegetables and herbs into an existing garden bed for an easy transition.

Or:

Go all out and turn your entire front yard into a flourishing vegetable garden. Urban front yard vegetable gardens are becoming very popular. They are a great alternative to a mono crop like grass and you get food too!

Gardening is cheaper than therapy, and you get tomatoes!

Many HOAs don’t allow edible gardens in front yards, but you can work edible plants into your landscape. If you have an urban vegetable garden in your front yard, please share how you did it in the comments!

Check out this list of tips for adding edible plants to your yard.

Growing a Beautiful Lawn Naturally: Bottom Line

You can grow a healthy, beautiful lawn without harmful chemicals!

Choose a native grass for your area. Add a complimentary plant like white clover or even wildflowers! Water when needed consistently but not as often. Fertilize naturally and add compost to improve soil.

The environment, your pets and pollinators like honey bees will thank you!

Do you grow your lawn using any of these sustainable methods? Tell me about it below!

Continue Reading...How to Grow a Beautiful Lawn Naturally


source http://wellnessmama.com/123908/grow-beautiful-lawn/?utm_source=rss&utm_medium=rss&utm_campaign=grow-beautiful-lawn

Monday 18 July 2016

The New Wellness Mama Cookbook Reveal…

Wellness Mama Cookbook cover

Guess what? I’ve been working on an amazing, updated cookbook with over 100 new recipes for over a year and I finally get to share it with you! Despite all of the literary comparisons of writing a book to birthing a baby, it turns out that the books do in fact take longer!

Here’s the cover:

Wellness Mama Cookbook cover

The NEW Wellness Mama Cookbook…

If you’ve been a reader for a few years (many thanks to you!), you may remember my original Wellness Mama Cookbook that I self-published a couple of years ago. What you may not have known about that cookbook is that I saved up for months to be able to afford to print copies in big enough quantity to make them a reasonable price to sell.

I love Amazon for all things shopping, but almost had a nervous breakdown trying to put it all together, so I decided not to print additional copies when the original copies ran out.

Old Wellness Mama Cookbook – Just $248?!

I was happy with my decision to never print more cookbooks until I got a few angry emails from wonderful readers who found my cookbook on Amazon and wanted to buy it. Except it cost over $200!

Since I hadn’t printed more copies, Amazon only had used copies and they were getting expensive. I also got a lot of emails asking for me to re-release it.

A Win:Win:Win

I’m so excited to announce that I’m finally re-releasing the cookbook and this time I have the help of an incredible editor and publisher!

In fact, it’s already available for pre-order from all of these places:

Amazon | Target | Barnes and Noble | Books A Million | Indie Bound

If you’re more of a digital person, it is also available on:

iBooks | Google Play | Kobo

I’ve added over 100 new recipes that aren’t on the blog or in the original cookbook and they’ve helped make the design and photos beautiful.

The Best Part?

The cookbook is SOOOO much better and it’s so much cheaper too! You can preorder right now at a heavily discounted price (as low as 35% off!)

(Also- The publishing team has people who specialize in dealing with the retailers to make everything happen… I’ll be sending them a gift basket and perhaps a hand-painted mural showing my gratitude!)

A Peek Inside…

The majority of the recipes in the new and improved cookbook are fast, easy and made with all-natural ingredients. Many are slow-cooker, Instant Pot or one-pot meals that come together quickly. From the more eloquent words in the official description:

With six kids, a popular blog, and no free time, Katie, creator of the incredibly popular Wellness Mama website, knows firsthand how difficult it is to cook a healthy, homemade dinner every night. Faced with her own health challenges, and also concerned about the frightening statistics on the future health of her children’s generation, Katie began to evaluate the foods she was eating and feeding to her family. She became determined to find a way to create and serve meals that were wholesome, easy to prepare, budget-friendly, and family approved. The Wellness Mama Cookbook is a compilation of all that she has learned, with 200 simple, delicious recipes using all-natural ingredients; meal plans; time-saving tips; and advice that will take the guesswork out of dinner.

The recipes and practical advice Katie offers will help you eliminate processed foods and move toward more healthy, home-cooked meals that are easily prepared—most in thirty minutes or less. The recipes focus on whole foods that are free of grains and refined sugars and without harmful fats, but are still delicious and full of flavor. With a variety of slow-cooker and one-pot meals, light lunches, dinners, and desserts, you’ll be eating better in every way in no time at all. Recipes include Sesame Chicken with Sugar Snap Peas, Sweet Potato Crusted Quiche Lorraine, Beef and Zucchini Stir Fry, and Chewy Chocolate Chip Cookies, as well as recipes for bone broths, fermented foods, and super food drinks and smoothies. Katie also shares pantry-stocking advice, two weeks of meal plans for at home and on-the-go, shopping lists, and more. This is the ultimate cookbook that readers need to incorporate healthy eating knowledge into their daily practices.

As of today, the new Wellness Mama cookbook is already available for pre-order from all of these places:

Amazon | Target | Barnes and Noble | Books A Million | Indie Bound

If you’re more of a digital person, it is also available on:

iBooks | Google Play | Kobo

If you pre-order now, you’ll get one of the first copies and it will ship to you on December 27, 2016.

Here’s a sneak peek into the cookbook to give you an idea of what kind of recipes you can expect…

Tons of great kid-tested and approved breakfasts and smoothies including my kids’ favorite Apple Cinnamon Muffins and Gorilla Green Smoothie:

135_WM_Gorilla Green Smoothie_1

Tons of awesome one-pan meals (because who likes doing dishes?), including many slow-cooker meals which save me all kinds of time in the kitchen.

Moroccan Stir Fry

All-time favorites like stuffed sweet potatoes, the easiest and best Slow-Cooker Fajita Chicken ever and so much more:

Stuffed Sweet Potatoes_1tif

There are over 200 recipes total and in all seriousness, my family could eat just these recipes for the rest of our lives and be completely happy. Some of my personal favorites from the new book (not featured on the blog):

  • Wedge Salad with Avocado Green Dressing
  • Bacon Guacamole Bites on Sweet Potato Chips
  • Swedish Meatballs
  • No-Bake Meyer Lemon Bars
  • Gorilla Green Smoothie

I can’t wait to hold a final copy of this cookbook in my hands, but while I work on final edits, you can pre-order from all of these places:

Amazon | Target | Barnes and Noble | Books A Million | Indie Bound

If you’re more of a digital person, it is also available on:

iBooks | Google Play | Kobo

If you pre-order now, you’ll get one of the first copies and it will ship to you on December 27, 2016.

What do YOU Think?

Between now and December when the cookbook officially releases, I’m working on bonuses giveaways to make it as useful to you as possible. Please take a second and tell me what bonus materials you’d like to see included with purchase:

What Bonuses Do You Want?

Loading…

I’m super excited about the new cookbook, and I hope you are too! Please let me know what bonuses you’d like if you purchase it!

Continue Reading...The New Wellness Mama Cookbook Reveal…


source http://wellnessmama.com/123815/new-wellness-mama-cookbook/?utm_source=rss&utm_medium=rss&utm_campaign=new-wellness-mama-cookbook

Thursday 14 July 2016

How to Minimize Chlorine Exposure When Swimming

How to Minimize Chlorine Exposure When Swimming

How to Minimize Chlorine Exposure When Swimming

We go to great lengths to remove chlorine (and other contaminants) in our drinking water and shower water, and it made me think about the effect of this common chemical in swimming pools and how much that exposure can affect us.

The Problem With Chlorine:

According to this article:

Swimming in a chlorinated pool may increase your risk of developing cancer, suggest a new suite of studies, which identified more than 100 chemical byproducts in pools that use chlorine as a disinfectant.

The crazy part:

You don’t even have to swim in the pool to be affected by some of the health risks. Chlorinated pools and other water sources also release chloramines.

What are Chloramines?

Chloramine is a gas that smells like chlorine and you’ve probably smelled this in hotels with indoor pools.

Sweat, sunscreens, urine and other chemicals and waste combine with chlorine to create chloramines. This oxidized chlorine gas and is present in the air around chlorinated pools and other water sources. As you can imagine, this is especially a concern in indoor pools without ventilation but can also be problematic in outdoor pools.

How to know:

A strong smell of chlorine is a pretty good indication that there are chloramines in a pool. This potent gas can also cause symptoms like coughing and sinus irritation. On the more serious end, it can cause symptoms like wheezing and even increasing asthma symptoms.

The CDC reports that:

Breathing of irritants may increase sensitivity to other types of irritants such as fungi and bacteria.

Even the American Academy of Pediatrics acknowledges the dangers of Chlorine. Their study of over 800 children revealed that chlorine exposure had a noticeable effect on children with allergies or asthma. They also found that even children without allergies or asthma were affected by prolonged or regular chlorine exposure.

I have read a number of studies that link the use of Chlorine to sanitize drinking water to increased risk of bladder cancer. In this study by the Oxford Journal Of Medicine they also speak about swimming pool use as a risk factor.

What to Do?

Our whole family loves the water, so while not swimming and filtering our home water would eliminate chlorine exposure, I’m not quite ready to throw the baby out with the pool water…

Thankfully, there are a few things that can be done to help minimize chlorine exposure:

  1. Avoid chlorinated pools whenever possible. In many places there are options that use salt filters (though these still contain chlorine but in smaller amounts) or UV filters. There are often great places to swim outdoors in some places. Obviously, not swimming in water sources that use chlorine is an easy way to reduce exposure. Thankfully, our local indoor pool uses salt and UV filters and no chlorine.
  2. Use Vitamin C: Check out this great article and the attached lectures for a great background on how Vitamin C helps neutralize chlorine and undo the damage of chlorine exposure. Turns out taking Vitamin C (ascorbic acid) internally and making some type of solution to rub on the skin can reduce a lot of exposure. Turns out they even make Vitamin C shower filters that are pretty inexpensive and which dechlorinate shower water. Since Vitamin C is often uses in anti-aging serums, this is a win-win solution!
  3. Protect the skin: Providing a physical barrier on the skin with an oil can also help reduce exposure. I like using my homemade lotion and adding Vitamin C. It is great for skin and protects from chlorine exposure (recipe below!). A commenter pointed out that many public pools do not allow lotions on the skin before using the pool so check with the rules if you use a public pool and check with your pool instructions if using your own pool.

Do You Have a Pool?

If you have a pool and swim regularly, the effects of chlorine exposure can be even more pronounced. Thankfully, if you own a pool, you also have the ability to control the methods used and limit your chlorine exposure.

There are many great chlorine-free filtration options available now. If you are building a pool, you can start with one of these for about the same price as a regular chlorine pump and system. If you already have a pool, you can convert it relatively easily to a chlorine-free system.

Chlorine-Free Systems

Many places now offer UV based systems that require minimal or no chlorine to operate. These systems kill over 99% of bacteria on their own, so trace amounts of other chemicals can be used. Our method is to use a UV filter and pump system and use food grade hydrogen peroxide as a safety net.

The goal with hydrogen peroxide is to keep it at about 50 ppm. We use simple test strips to test and add about 2 cups of hydrogen peroxide per 1000 gallons of water every couple of weeks.

The important note here is to use food grade 35% hydrogen peroxide. The stuff from the drugstore is only 3% and you’d need a whole to shock a pool. 35% hydrogen peroxide is super concentrated, so use caution when handling it, but it is completely safe once in the pool because it is diluted so much.

Not only is this the most natural method I’ve found, it has been really simple to use and the only other factor we have to look at is balancing the pH. It is also pretty comparable cost wise to other methods.

If you swim in a pool that isn’t your own or can’t convert to a chlorine-free system, something as simple as a de-chlorinating lotion can help. It can also be helpful to shower in  a shower with a Vitamin C filter before and after swimming.

Dechlorinating Lotion

How to Make Lotion

  1. Combine oils and beeswax  in a pint sized or larger glass jar. I have a mason jar that I keep just for making lotions and lotion bars, or you can even reuse a glass jar from pickles, olives or other foods.
  2. In another small jar or bowl, add the vitamin c powder to the warm water and stir until dissolved.
  3. Fill a medium saucepan with a couple inches of water and place the jar with the oils inside the saucepan and turn on medium heat.
  4. As the water heats, the ingredients in the jar will start to melt. Shake or stir occasionally to incorporate. When all ingredients are completely melted, pour into a small blender or food processor. (Keep in the jar if using an immersion blender that will fit in the top of the jar.)
  5. With blender or food processor on, slowly add the water/vitamin C mixture until blended and emulsified.
  6. Store in an air-tight glass jar.
  7. Use before swimming (preferably after rinsing skin) to minimize chlorine exposure. This is purposefully a small batch since no preservatives are used and it will only  last one swim season.
  8. Enjoy and be chlorine free!

Other Options (No DIY required)

Those who use sunscreen can add vitamin C powder to pre-made sunscreen to get the benefits of chlorine reduction and sun protection at the same time.

Do you worry about chlorine exposure? How do you avoid it?

Continue Reading...How to Minimize Chlorine Exposure When Swimming


source http://wellnessmama.com/10658/minimize-swimming-chlorine-exposure/?utm_source=rss&utm_medium=rss&utm_campaign=minimize-swimming-chlorine-exposure